Imagine you have spent hours meticulously crafting a digital masterpiece. You have picked the perfect shade of sunset orange and a deep, moody violet for the shadows. But when you upload your work to your portfolio or send it to a printer, something looks wrong. The orange looks like burnt sienna, and the violet has turned into a muddy grey. This frustrating experience is usually caused by one thing: an uncalibrated monitor.
While having a 4K monitor is a great start for any aspiring designer because of the incredible detail and sharpness, resolution isn’t everything. A high-resolution screen can still display colors that are “liars.” Calibration is the process of “tuning” your monitor so that the colors you see on the screen match the international standards used by the rest of the creative world.
Why Your Eyes Aren’t Enough
You might think you can just adjust the brightness and contrast until the screen “looks right.” However, the human eye is incredibly adaptable—too adaptable, in fact. If you work in a room with warm yellow light, your eyes will eventually compensate, making your monitor look blue by comparison. Professional design requires a level of consistency that your eyes simply cannot maintain on their own.
Before you begin the calibration process, there are a few environmental factors you need to handle to ensure you get the best results:
-
- Warm Up the Hardware: Your monitor needs to reach a stable operating temperature. Turn it on and let it run for at least 30 minutes before you start calibrating.
- Control Your Lighting: Avoid working under direct sunlight or harsh, colored lamps. Ideally, your room should be dim with neutral lighting to prevent glare and color contamination.
- Clean the Screen: Even a thin layer of dust or a few fingerprints can distort the way light hits the calibration sensor. Use a microfiber cloth to gently wipe the surface.
- Reset to Factory Settings: Start with a blank slate by going into your monitor’s built-in menu and resetting everything to the default settings.
Choosing Your Calibration Method
There are two main ways to calibrate a screen: software-based and hardware-based. Software calibration involves using built-in tools in Windows or macOS to adjust settings by eye. While this is free, it is rarely accurate enough for professional design.
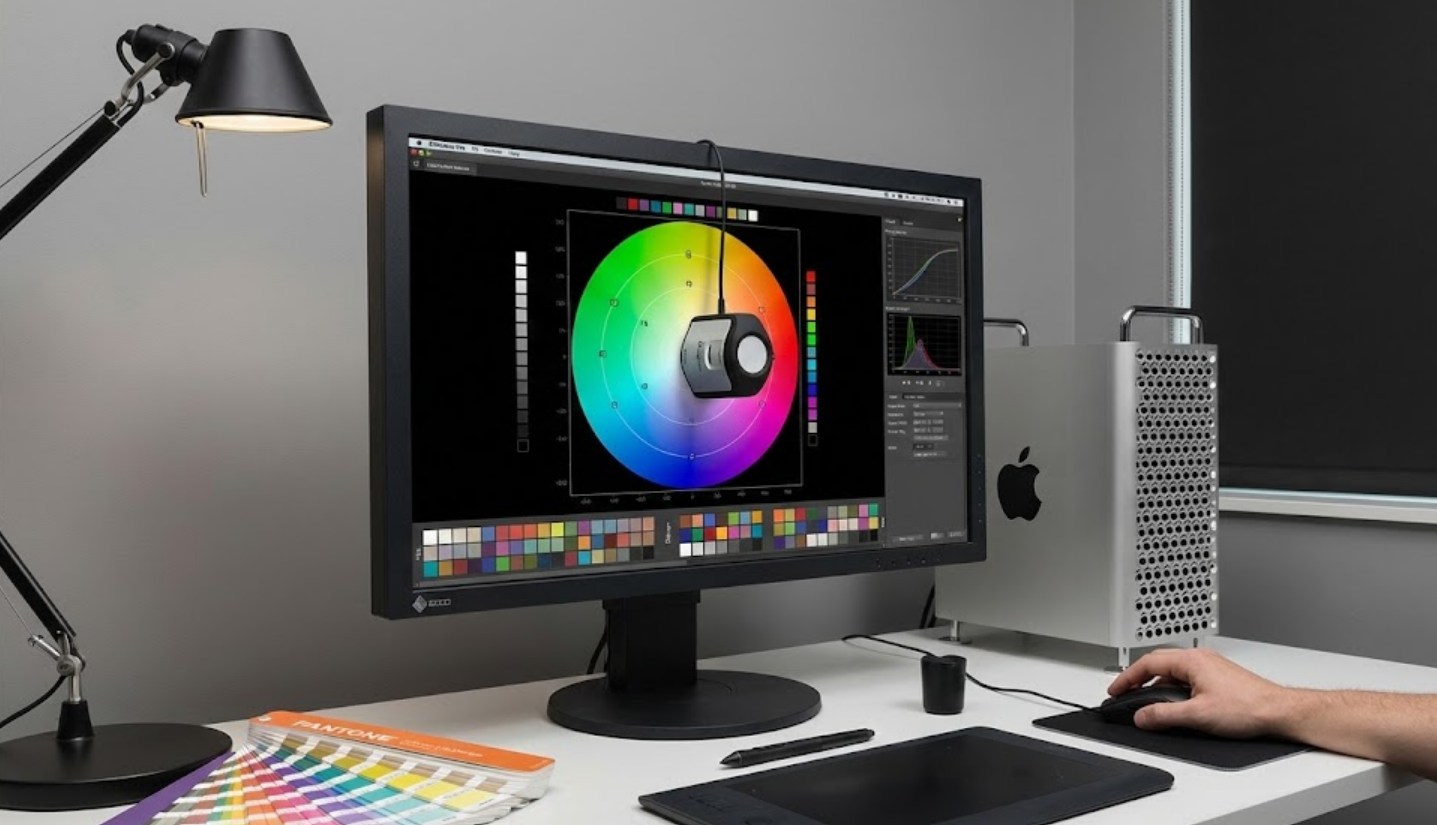
Hardware calibration is the gold standard. This involves using a device called a “colorimeter” or “spectrophotometer.” These look like small computer mice that hang over the top of your screen. They “read” the colors your monitor is actually producing and compare them to what it should be producing.
The Step-by-Step Calibration Process
If you are using a hardware tool, the software provided with the device will guide you through most of the steps. However, you will need to understand certain targets to ensure your 4K monitor is set up correctly for design work:
-
- Select the White Point: For most designers, the standard is D65 (or 6500K). This represents natural daylight and ensures your whites don’t look too “warm” (yellow) or too “cool” (blue).
- Adjust the Gamma: Gamma affects how the mid-tones appear. For professional design and web work, a Gamma setting of 2.2 is the universal standard.
- Set the Luminance (Brightness): This is where many people go wrong. Most monitors come out of the box far too bright. For a controlled editing environment, a brightness level between 100 and 120 cd/m² (candelas per square meter) is usually perfect. If it’s too bright, your prints will always come out looking too dark.
- Run the Test: The software will flash a series of colors—reds, greens, blues, and grays—on your screen. The sensor will analyze these and create a custom “ICC Profile.
- Save and Apply: Once finished, the software will save this profile to your computer’s operating system. You should instantly see a subtle (or sometimes dramatic) shift in color.
Maintaining Your Accuracy
Calibration is not a one-time event. Monitors are physical pieces of hardware that age over time. The backlights can dim or shift in hue as they rack up thousands of hours of use. Think of it like tuning a musical instrument; even the best guitar will eventually go out of tune if you play it every day.
Most professional designers recalibrate their monitors once a month. If you are working on a very high-stakes project, such as a national ad campaign or a high-end photography book, you might even recalibrate once a week.
By taking the time to calibrate your 4K monitor, you are removing the guesswork from your creative process. You can design with the confidence that the colors you see are the “truth.” Whether your work is viewed on a smartphone, another high-end monitor, or a physical billboard, calibration ensures your artistic vision remains consistent from start to finish.